English
 Espaol
 Franais
 阿拉伯
阿拉伯 中文
中文 Deutsch
 Italiano
 Português
 日本
日本 韓國
韓國 български
 hrvatski
 esky
esky Dansk
Dansk Nederlands
 suomi
suomi Ελληνικ
 印度
印度 norsk
norsk Polski
 Roman
Roman русский
 Svenska
Perkins珀金斯900 3.152柴油發動機ZZ50272氣缸體總成供應商,Perkins珀金斯900 3.152柴油發動機ZZ50272氣缸體總成技術價格規格咨詢服務,Perkins珀金斯900 3.152柴油發動機ZZ50272氣缸體總成零配件供應,Perkins珀金斯900 3.152柴油發動機ZZ50272氣缸體總成售后服務中心,Perkins珀金斯900 3.152柴油發動機ZZ50272氣缸體總成,Perkins珀金斯900 3.152柴油發動機ZZ50272氣缸體總成詳細的技術參數,

Perkins珀金斯900 3.152柴油發動機ZZ50272氣缸體總成
詳細描述
項目 零配件號碼 最新件號 描述
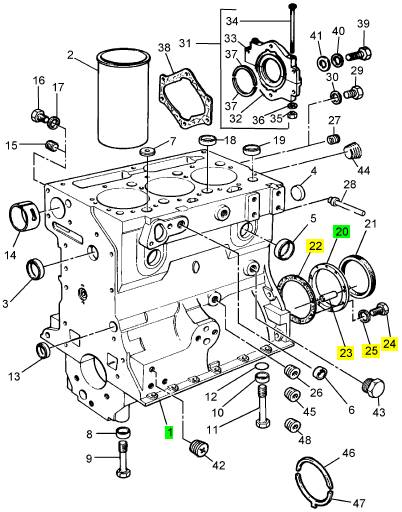
1 ZZ50272 1 ZZ50272 氣缸體總成
(1) ZZ50272P 1 ZZ50272P 氣缸體總成
20 4142 V002 1 4142 V002 密封 - 再操作系統殼
22 33826111 1 33826115 密合墊
23 0350015 2 0350015 合釘
24 0746255 9 0746255 螺旋
25 0920003 9 0920003 墊圈
|
Disassembly and Assembly Section |
|
NOTICE Keep all parts clean from contaminants. |
|
Contaminants may cause rapid wear and shortened component life. |
|
1. Ensure that the engine oil filter base is clean and free from damage. Clean the mating surfaces of the engine oil pump and the cylinder block. |
|
g01380571 |
|
Illustration 55 |
|
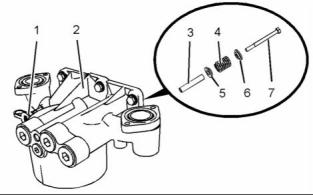
5. Follow Steps 5.a and 5.b in order to install the high pressure relief valve. |
|
a. Lubricate sleeve (3), seat (5), spring (4) and cap (6) with clean engine oil. |
|
b. Install sleeve (3), seat (5), spring (4), cap (6) and bolt (7) to engine oil filter base (2). Tighten the bolt to a torque of 12 N·m (105 lb in). |
|
g01404137 |
|
Illustration 56 |
|
6. If necessary, install a new O-ring seal to oil sampling valve (1) and install the oil sampling valve to engine oil filter base (2). Tighten the oil sampling valve to a torque of 24 N·m (18 lb ft). |
|
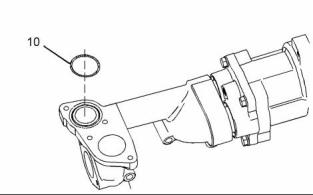
2. Install a new O-ring seal (10) to the engine oil pump. |
|
End By: |
|
a. Install the engine oil filter base. Refer to Disassembly and Assembly, “Engine Oil Filter Base - Install”. |
|
i02754783 |
|
Engine Oil Filter Base - Install |
|
Installation Procedure |
|
g01401581 |
|
Illustration 57 |
|
Table 14 |
|
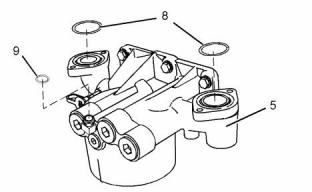
3. Install new O-ring seals (8) and (9) to engine oil filter base (5). |
|
Required Tools Part |
|
Tool |
|
Number |
|
Part Description |
|
Qty |
|
POWERPART Threadlock and Nutlock |
|
A |
|
21820117 |
|
1 |
|
POWERPART Special Lubricant |
|
B |
|
CV60889 |
|
1 |
|
This document has been printed from SPI². Not for Resale |
![]()
![]()

![]()
![]()
![]()
![]()
![]()
|
KENR6906 |
|
29 Disassembly and Assembly Section |
|
i02754784 |
|
Engine Oil Cooler - Remove |
|
Removal Procedure |
|
NOTICE Keep all parts clean from contaminants. |
|
Contaminants may cause rapid wear and shortened component life. |
|
NOTICE |
|
Care must be taken to ensure that fluids are contained during performance of inspection, maintenance, test- ing, adjusting and repair of the product. Be prepared to collect the fluid with suitable containers before open- ing any compartment or disassembling any compo- nent containing fluids. |
|
g01396094 |
|
Illustration 58 |
|
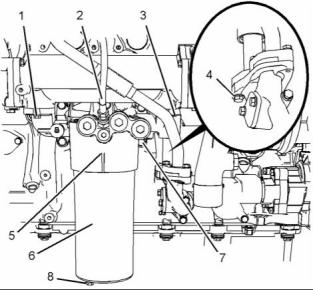
4. Apply Tooling (A) to the threads of bolts (7). |
|
Dispose of all fluids according to local regulations and |
|
mandates. |
|
5. Support the weight of the engine oil cooler. The engine oil cooler weighs approximately 23 kg (50 lb). |
|
1. Drain the coolant from the cooling system into a suitable container for storage or for disposal. Refer to Operation and Maintenance Manual, “Cooling System Coolant - Change”. |
|
6. Position a new joint and engine oil filter base (5) on the cylinder block. |
|
7. Install bolts (7). Tighten the bolts to a torque of 55 N·m (41 lb ft). |
|
8. Connect the tube assembly to the engine oil pump and install bolts (4). Tighten the bolts to a torque of 28 N·m (21 lb ft). |
|
9. Install bolts (1) and (3). Tighten the bolts to a torque of 28 N·m (21 lb ft). |
|
10. Connect hose assembly (2). |
|
11. Install a new O-ring seal and a new filter element to engine oil filter (6). Apply Tooling (B) to the threads of the engine oil filter. Install the engine oil filter to engine oil filter base (5). Use a suitable tool with a 1/2" square drive in order to tighten the engine oil filters. |
|
Refer to Operation and Maintenance Manual, “Engine Oil and Filter - Change” for more information. |
|
g01401585 |
|
Illustration 59 |
|
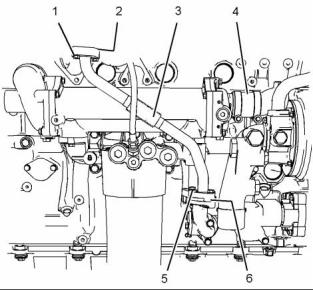
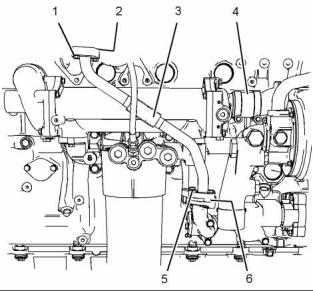
2. Loosen the hose clamps and slide hose (4) forward in order to disconnect the hose from the engine oil cooler. |
|
Install a new O-ring seal to plug (8). Install the plug to fuel filter (6). |
|
3. Follow Step 3.a through Step 3.c in order to remove tube assembly (3). |
|
a. Remove bolts (1) and joint (2) (not shown). |
|
This document has been printed from SPI². Not for Resale |
![]()
![]()
![]()
![]()
![]()
![]()
![]()
|
30 |
|
KENR6906 |
|
Disassembly and Assembly Section |
|
b. Remove bolts (5) and tube assembly (3). |
|
c. Remove O-ring seal (6) (not shown) from tube assembly (3). |
|
g01401595 |
|
Illustration 61 |
|
11. Remove O-ring seals (14) from engine oil filter base (15). |
|
i02754785 |
|
Engine Oil Cooler - Install |
|
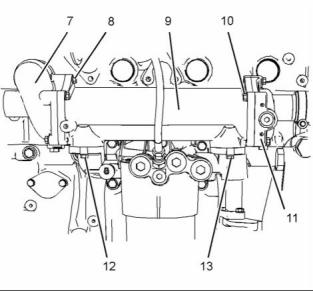
g01403771 |
|
Illustration 60 |
|
Installation Procedure |
|
4. Attach a suitable lifting device to engine oil cooler (9) in order to support the weight of the engine oil cooler. The engine oil cooler weighs approximately 23 kg (50 lb). |
|
NOTICE Keep all parts clean from contaminants. |
|
Contaminants may cause rapid wear and shortened component life. |
|
5. Remove bolts (12) and bolts (13). 6. Remove bolts (10). |
|
1. Ensure that the oil cooler is clean and free from damage or restriction. Clean the mating surfaces of the cooler connections and the engine oil filter base. |
|
Note: The rear bolt needs only to be loosened in order to remove connection (11). |
|
7. Remove connection (11). Remove the O-ring seal from the connection. |
|
8. Remove bolts (8). |
|
9. Carefully remove engine oil cooler (9). 10. Remove the O-ring seal from connection (7). |
|
g01401595 |
|
Illustration 62 |
|
2. Install new O-ring seals (14) to engine oil filter base (15). |
|
This document has been printed from SPI². Not for Resale |
![]()
![]()
![]()

![]()
![]()
![]()

|
KENR6906 |
|
31 Disassembly and Assembly Section |
|
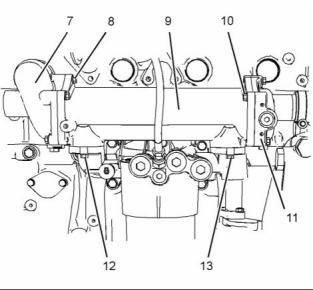
g01403771 |
|
g01401585 |
|
Illustration 63 |
|
Illustration 64 |
|
3. Install new O-ring seals to connections (7) and (11). |
|
9. Follow Step 9.a through Step 9.d in order to install tube assembly (3). |
|
4. Attach a suitable lifting device to engine oil cooler (9). The weight of the engine oil cooler is approximately 23 kg (50 lb). |
|
a. Install a new O-ring seal (6) (not shown) to tube assembly (3). |
|
b. Install a new joint (2) and bolts (1) to tube |
|
5. Position engine oil cooler (9) on the engine oil filter base. |
|
assembly (3). |
|
c. Position tube assembly (3) on the engine and tighten bolts (1) finger tight. |
|
6. Install bolts (8). Tighten the bolts to a torque of |
|
28 N·m (21 lb ft). |
|
d. Install bolts (5). Tighten bolts (1) and five to a |
|
7. Position connection (11) on engine oil cooler (9) and install bolts (10). Tighten the bolts to a torque of 28 N·m (21 lb ft). |
|
torque of 28 N·m (21 lb ft) . |
|
10. Connect hose (4) and tighten the hose clamps securely. |
|
8. Install bolts (12) and (13). Tighten the bolts to a torque of 28 N·m (21 lb ft). |
|
11. Fill the cooling system. Refer to Operation and Maintenance Manual, “Cooling System Coolant - Change”. |
|
This document has been printed from SPI². Not for Resale |
![]()
![]()
![]()